
Harris, Reed & Seiferth
|
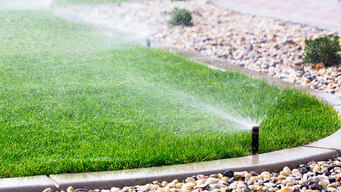 After what felt like an endless winter, everything is slowly starting to thaw out and melt. Spring is one of my favorite times of the year, and as a new homeowner, I am starting to observe new things on my home that I need to inspect, and projects I want to tackle this summer. I purchased my home in the dead of winter with snow piled up on the exterior, so I couldn't fully see everything as much as I would have liked. Now that I have a clear view, it's time to start my spring maintenance checklist and inspect for any damage sustained during winter.
Source: https://www.foremost.com/learning-center/inspecting-your-home-after-winter.asp
0 Comments
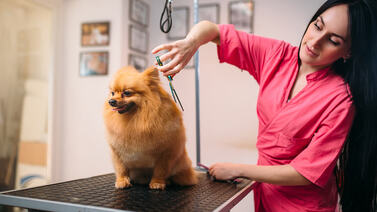 Intervention: it's time to take your stinky pup to the groomer! No matter what kind of dog you have, short-haired or long, a trip to the groomer is well worth the investment. Not only are they given a thorough cleaning, most groomers will also offer nail clippings, a hair trim or shave, and skin exfoliation. But before you whisk your furry friend away on that car-bound adventure, there's a few things you should know. Our team did a Q&A with a local expert and she answered some of our burning questions. How often should you bring your pet to the groomers? We recommend that you check into the groomers every 4-6 weeks. Of course, this will depend on how long you want your dog's hair to be and how much care you'd like to do at home. Breeds with shorter hair (like labs and terriers) can sometimes go even longer depending on how much they shed. Show dogs should be bathed and brushed out once or twice a week to keep their coat and skin in tip top shape! How should I transport my dog to the groomers? Always be sure to have your pet on a leash and collar or harness when visiting the groomer, even if you think your pet is friendly. Different sights, sounds and smells can trigger unusual behavior, especially if there are other animals in the area. Keep a good hold on your dog to make sure everyone stays safe, including your pup! How do I prepare a nervous dog to behave well? If you see signs of nerves, bring your pet to meet the groomer first! Yes, this makes a second trip, but it will often help since they'll be comfortable with the groomer before any work gets done. For more tips on soothing your dog's anxiety, check out this great source from Vet Street. Do not use human shampoo to bathe your dogs – the acidity can upset the balance of their skin How can I find a good groomer in my area? The breeder you got your dog from might have great recommendations for a groomer since they're familiar with the territory. Veterinarians are also a good resource, as are your friends. Ask around and feel free to switch until you find someone you really like. How specific should I be when describing what I want to the groomer? It doesn't hurt to describe what you would like your pet to look like after all is done at the groomers, but make sure to remember that every dog's hair is different. What looks adorable on one dog may look strange on yours. How can I maintain in between trips? Most pets will require some maintenance in between trips to the groomers. If they're getting smelly or their fur has tangles, a bath is a great start! After brushing your pet, go through with a comb and make sure you've brushed all the way to the skin to avoid matting. Remember, grooming isn't just about the hair! Groomers also have the awesome ability to find health hazards owners would otherwise be oblivious to. Ear infections, a lump or bump, skin irritation and even enlarged limp-nodes are all things your groomer can help diagnose, which will keep your pup happy and make your life easier. Want more expert advice for your pets? Check out these blogs written just for you! Source: https://www.foremost.com/learning-center/a-trip-to-the-dog-groomer.asp
 Most bikers hang up their helmets when the temperature drops, but the dedicated crowd rides on. The key, they say, is staying warm and toasty. It’s easier to stay warm while you ride than one might think. The temperature feels colder when you are piercing through the air at high speeds, but heated motorcycle accessories and good old fashioned layering will keep you comfortable during your fall ride. Try these tactics to stay warm this fall!
Now that you know how to stay warm, get the most out of your bike with year-round riding! Just remember to be safe and, most importantly, have fun. Source: https://www.foremost.com/learning-center/stay-warm-while-you-ride.asp
 A burglary occurs approximately every 15 seconds in the United States. Home security has become an important issue for everyone, no matter where you live. While there's no foolproof way to stop every break-in, many burglaries are preventable. Keep in mind that burglars search for easy targets. Here are some security measures that may force burglars to look elsewhere: Use the right locks and solid doors
Secure sliding patio doors and windows:
Protect your home with proper lighting:
Don't give thieves an easy way in:
Source: https://www.foremost.com/learning-center/home-theft-deterrents.asp
 Apparently I fell off the face of the planet when it comes to car seat safety. Despite reading all the NHTSA tips for car seats, doing the safety checks, and experiencing Michigan winters my whole life, I have never, ever heard of winter car seat safety. If have a bundled up little one, this is a must-read and must-share on your Facebook page to educate other parents. The rule to remember: No bulky coats on children in car seats. First, let me divulge a few of the (brutally honest) thoughts that came to mind when I heard this:
Here's a simple way to test the bulk of your child's coat:
Keep them warm, and safe. If you find your child's coat is too bulky to buckle them in safely, here are some alternate options to keep your child warm:
Source: https://www.foremost.com/learning-center/car-seat-safety-for-snow-state-mommies-and-daddies.asp
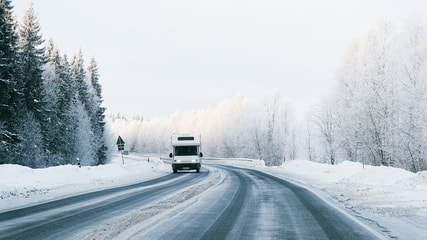 I apologize if you're holding on to your last days of warmth, but winter will be here before you know it! If you travel year-round in an RV and are looking forward to camping in snowy weather, be prepared for poor road conditions. Here are three tips to keep you, your family, and your RV safe during wintertime travel:
Source: https://www.foremost.com/learning-center/three-tips-for-driving-your-RV-in-the-snow.asp
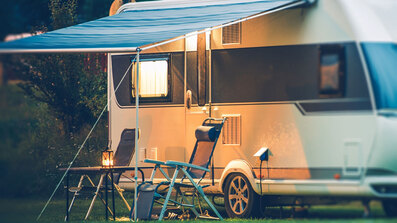 Transitioning from a home where you have roots in one place to a full-time life on the road is a drastic change, but there are many things that draw people to this “nomad” lifestyle. It could be the flexibility, the love of traveling, or maybe you just want to get out of your comfort zone and try something new! Whatever the reason may be, if you’re preparing to be an RV full-timer, kudos for having the courage to embrace this exciting lifestyle change. We know it can be overwhelming to think about the details involved with living full-time in an RV, and your choice to welcome the open road may seem impulsive to others, but that’s okay. Life is short, and who knows … you may end up regretting not doing this sooner! Here are some tips to help you prepare for living in an RV full-time. Become a Minimalist. Adapting a minimalist lifestyle often requires major changes. You’re probably going from a normal-sized home to a roughly 270 square foot space, which forces you to ask: “What do I really need?” To determine this, start by writing down everything you want to bring, then write another list of everything you actually need. This will help you visualize and prioritize your possessions. Bring all the necessities, of course – clothes, toiletries, shoes, cookware, etc. However, you won’t nee d 10 pairs of boots, or the many t-shirts that have been sitting in your drawers for 2+ years, or 20 drinking glasses that you currently have in your kitchen. You may need to make some tough decisions, but take this opportunity to de-clutter your belongings. Make a “take” pile and a “donation” pile. It’s always a good idea, even if you aren’t planning to RV full-time! Go Paperless. Life on the road means you won’t be home to pick up your mail and see if you received any bills. Move all of your bills (cell phone, medical, credit cards, auto insurance, etc.) to automated billing so you don’t need to worry about it. Once you make the switch, you should get all notifications for your bills via email moving forward. Plus, this helps save the environment! Sell or Keep Your Home? This brings us to our next question – will you make the commitment to sell your home and have your RV be your only residence? This depends on how much you plan to travel throughout the year. Also, can you afford to keep your home while traveling? You will still have your mortgage payments, maintenance on the home and other obligations. If you decide to keep your home, there’s always the option of renting it out so you won’t have to worry about any mortgage payments. If you don’t start renting, make sure you have someone regularly stopping by your home to get the mail and take care of any maintenance needed as the seasons go by. If you do decide to sell your home or cancel a lease, you will need to choose a domicile state and receive mail. Getting a domicile means you are choosing a state for your legal residence. This state will be listed on your driver’s license, where you purchase your health insurance, where you can vote and where you will accept mail. (There are lots of mail-forwarding services that will set you up with a street address so you can officially establish residency. This is helpful because a P.O. Box address will not be accepted as your legal residence). The best states for full-time RVer domiciles are Texas, Florida or South Dakota.* People usually choose these states because they are income tax-free! Selling your home will also allow more financial freedom for your RV travels! Get that estate sale ready, or find a storage unit to put all of your furniture in, just in case you ever want a break from the RV life. Determine a Monthly Budget. You may think you’ll be saving a lot of money when you live on the road – but you will be surprised. Since your expenses will be drastically different from when you lived in a home, you need to budget and keep track of everything you spend. Things like campsite fees, eating out frequently, gas and unexpected RV repairs can add up. Once you get a good idea of how much you’re spending each month, you can adjust your budget accordingly. Purchase Full-Time RV Insurance. Since your RV will be your permanent residence, you need a specific type of insurance coverage called “Full-Time RV Insurance.” You will be covered against liabilities, Additional Living Expenses, medical expenses in the case of an accident and more! Contact one of our local agents today to get more information on how you can get covered, so you can enjoy your travels across the U.S., or start an RV quote now! Stay Connected with Family and Friends. Communicate with your friends and family on a regular basis. (They will miss you!) It’s also a good idea to let a few people know your current location and where you’re headed next on a regular basis, just in case of an emergency. To make your loved ones feel like they’re part of your adventure, post pictures frequently on social media or send them via text or email. It will let everyone know you and your companions are safe, and also allows you to stay connected with everyone even when you’re not physically with them. Enjoy Every Minute. Living life on the road is a once-in-a-lifetime experience. You will see amazing things, meet one-of-a-kind people and make the best memories. Don’t take it for granted! With traveling, you will always run into some bumps in the road – but that’s part of the journey. Don’t let it discourage your long-term goals. You’re not tied down to a routine now, so enjoy the freedom and independence that comes with RVing full-time. Stay safe and happy travels from Foremost! Source: https://www.foremost.com/learning-center/a-guide-for-full-time-rv-living.asp
*https://www.moneycrashers.com/rv-living-choose-domicile-state-get-mail/  Anyone who's been through a flood knows that recovering after this kind of disaster isn't easy. You're forced to accept that irreplaceable family treasures and memories may be gone forever, your furniture is destroyed, potentially along with your home. It's a devastating and emotional moment and a lot to take in all at once. But you know the only thing you can do is move forward, and begin the steps needed to restore your home. As soon as the floodwaters recede, you can return to your home as long as officials give the OK to do so. Before entering your home, however, make sure it is safe! Tips for staying safe upon return:
Tips for claim reporting: Another important step to take when recovering from a flood is reporting your loss immediately to your insurance agent or carrier. While flood coverage is typically not provided under most homeowners and renters policies, flood insurance may be available to you through the federally regulated program known as the National Flood Insurance Program (NFIP). If you need assistance to locate your flood insurance carrier, you can call 1-800-621-FEMA (3362). A claims adjuster should contact you within a day or two after report of the claim, depending on the severity of the flood event. When reporting a claim, you should have the following information available:
Tips for inspections: The next step, according to the Federal Emergency Management Agency (FEMA), is to prepare for your inspection. After deeming the structure safe for entry, take as many photos or videos of the flood-damaged property on the outside and inside. Take pictures of high-cost items as well like washers and dryers, hot water heaters, televisions and kitchen appliances. It's also a good idea to separate the damaged from undamaged items prior to the inspection. When the adjuster arrives, they will inspect your property including taking measurements and photos and give you an overview of the NFIP flood claims process. Remember that some flood insurance claims are more complex than others. Some may be opened and closed quickly, while others may take weeks or even months to resolve. If your vehicle was also damaged in a flood event, it's best to call your auto insurance provider to see if you're covered for the loss. Source: https://www.foremost.com/learning-center/what-to-do-after-a-flood
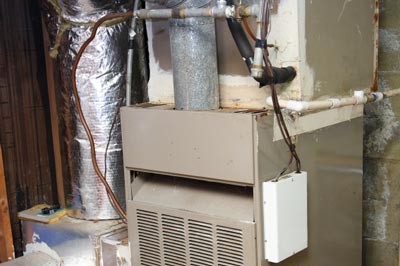 If you smell gas, get everyone out. Use your neighbor's phone to call a qualified repair person or the gas company immediately. If possible, shut off the gas main from outside the home. Caution: Never attempt to repair gas lines yourself.
https://www.foremost.com/learning-center/furnace-safety.asp
 Are we in the midst of an "arctic hurricane" like the media describes? I'm not so sure. Even at 0 degrees with a -30 wind chill, it seems like it always gets this cold during the winter in Michigan. Nonetheless each year we see the same dilemmas that happen when the weather gets chilly. Surprisingly, one of the most common problems that homeowners face this time of year is frozen water pipes. If you know of anyone that is in this predicament right now like I do, be sure to pass along this information to safely get their pipes thawed:
What should you do if a water pipe freezes? You should make sure it never happens again! When the water freezes, it tries to expand inside the pipe. It pushes against the sides of the pipe, as well as any nearby valves, seams and faucets. The freezing action of the water is more than capable of rupturing any pipe. Unfortunately, a water pipe may freeze even if you have taken precautions. Whatever the cause, it's important that you thaw out your pipe for two reasons:
Here are some methods to thaw out frozen pipes: CAUTION!: Before you try any of these methods, first open the faucet the frozen pipe supplies. The steam you create while heating the pipe can burst the pipe if it doesn't have an escape. Method #1: Use electric heat tape on the pipe, and wait for it to thaw out. This is a good method to use because it slowly thaws the pipe, which means it reduces wear and tear on the pipe itself. CAUTION!: Remember to use only heat tape certified by a nationally recognized testing laboratory for use with mobile homes. Be careful never to wrap the heat tape back over itself. This could cause the heat tape to overheat and start a fire. Method #2: Wrap the pipe with several layers of cloth or toweling and pour hot water over the cloth / toweling. Repeat several times until the pipe is unfrozen. Method #3: Direct a heat lamp on the pipe itself. Place the lamp at least a foot away from the pipe. Cover adjacent areas with a layer of aluminum foil so the heat does not scorch these materials. Make sure the heat lamp is on dry ground. Even better, plug it into a ground Fault Circuit Interrupter (GFCI) outlet. CAUTION!: Do not use any direct heating method if the frozen pipe is next to a gas pipe! Call a professional for help. Method #4: Hold a hand-operated hair dryer to the pipe, and slowly move up and down the length of the frozen section. Make sure you are standing on dry ground. Because you are working this close to water, plug the dryer into a GFCI protected outlet. You will know the pipe is thawed out when water starts to trickle out of the open faucet. Let the water run for a while to completely clear the pipe. Then, close the faucet and check for leaks. CAUTION!: Do not use a propane torch to thaw out frozen pipes. Do not use a propane torch even if it has a fire spreader attachment. This is not only a fire hazard, bit it's also a quick way to destroy your plastic plumbing pipes. We want you to be safe in your home and prevention is the key. |
Categories
All
Archives
October 2023
|
 RSS Feed