Harris, Reed & Seiferth Insurance Group
  • Home
  • Quotes
    • Property >
      • Home Quote
      • Condo Quote
      • Mobile Home Quote
      • Renters Quote
      • Personal Vacant Property Quote
      • Flood Quote
      • Landlords Quote
      • Personal Inland Marine Quote
      • Personal Vacant Land Quote
      • Builder's Risk Quote
    • Vehicles >
      • Auto Quote
      • Motorcycle Quote
      • Scooter Quote
      • Snowmobile Quote
      • ATV Quote
      • Motor Home/RV Quote
      • Golf Cart Quote
      • Roadside Assistance Quote
    • Life >
      • Life Insurance Quote
    • Medical >
      • Health Quote
      • Dental Quote
      • Vision Quote
      • Critical Illness Quote
      • Disability Quote
      • Medicare Supplement Plan Quote
      • Long Term Care Quote
    • Business >
      • Business Quote
    • Specialty >
      • Boatowners Quote
      • Umbrella Quote
      • Travel Insurance Quote
      • Private Horse Owner Liability Quote
  • Products
    • Property >
      • Learn about Home Insurance
      • Learn about Builder's Risk Insurance
      • Learn about Condo Insurance
      • Learn about Renters Insurance
      • Learn about Mobile Home Insurance
      • Learn about Personal Inland Marine Insurance
      • Learn about Vacant Land (Personal)
      • Learn about Vacant Property
      • Learn about Flood Insurance
      • Learn about Landlords Insurance
    • Vehicles >
      • Learn about Auto Insurance
      • Learn about Classic Car Insurance
      • Learn about Motorcycle Insurance
      • Learn about Snowmobile Insurance
      • Learn about ATV Insurance
      • Learn about RV Insurance
      • Learn about Golf Cart Insurance
      • Learn about Scooter Insurance
      • Learn About Roadside Assistance Insurance
    • Life >
      • Learn about Life Insurance
      • Learn about Guaranteed Issue
    • Medical >
      • Learn about Health Insurance
      • Learn about Dental Insurance
      • Learn about Vision Insurance
      • Learn about Critical Illness Insurance
      • Learn about Disability Insurance
      • Learn about Long Term Care Insurance
      • Learn about Medicare Advantage Plans Insurance
    • Business >
      • Learn about Business Insurance
      • Learn about Commercial Marine Liability Insurance
      • Learn about USLH & States Act Workers Compensation Insurance
    • Specialty >
      • Learn about Boatowners Insurance
      • Learn about Aviation Insurance
      • Learn about Umbrella Insurance
      • Learn about Travel Insurance
      • Learn about Private Horse Owner Liability Insurance
      • Wedding Plus
      • Special Events
  • Service
    • Update Contact Info
    • Policy Changes
    • Proof of Insurance
    • Report a Claim
  • Resources
    • Blog
    • Free Home Inventory Checklist
    • Free Disaster Preparedness Plan
    • Free Family Emergency Plan
    • Refer a Friend
  • About
    • Insurance Carriers
    • Accessibility Statement
    • Contact

Harris, Reed & Seiferth
​Insurance Group Blog

How to Replace Mobile Home Skirting

5/27/2023

0 Comments

 
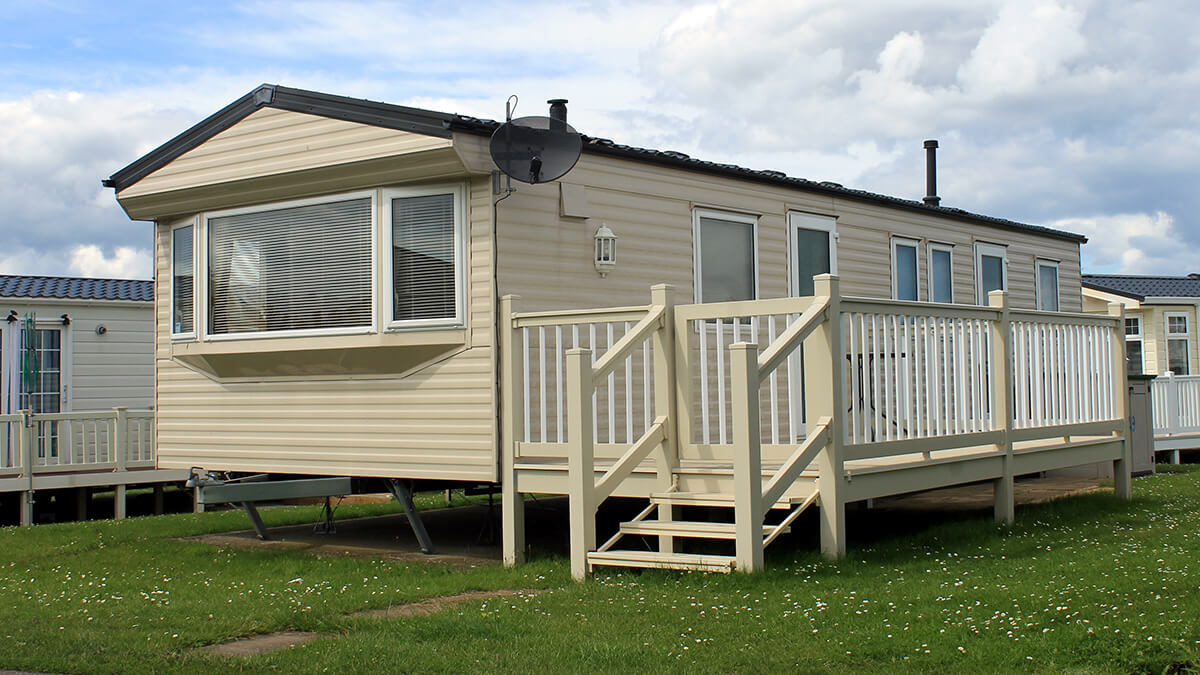
Out of sight, out of mind! It's a saying that's too often true about making repairs around the base of your home. Problems with manufactured home skirting are common, but thankfully, replacing your mobile home's skirting is easier than you might think.
Picture
​Most manufactured homes have skirting attached to the base of the home. This skirting protects your pipes and other fixtures, reduces updrafts and helps to control moisture. Damaged aluminum and vinyl skirting panels should be replaced, not patched. Fortunately, individual panels are not very expensive and are easy to replace. If you have trouble finding identical replacement panels, switch the damaged panel with one in a less conspicuous location. Or, if your skirting is aluminum, buy a panel in a similar pattern and paint it to match. In warmer climates, a screen or louvered vent can also be used as a replacement.

Besides your replacement panel, you'll need tin snips, a measuring tape and a pencil.

Step 1: Remove damaged/worn panel.
Slide the panel up until it is above the ground channel. Pull it out from the bottom and slide the rest of the panel out. With some types of skirting, it's easier to remove panels if you unsnap the trim.

Step 2: Cut replacement panel.
Measure the damaged panel to determine the size of a replacement panel. Both aluminum and vinyl skirting panels can be cut with tin snips. Remember to keep the top of the panel straight.

Step 3: Insert new panel.
Slide the top of the panel in first, and then lift to insert the bottom into the ground channel. If you removed the top trim front, make sure the replacement panel is in place, then snap the top trim front back in place.

Check out the mobile home page for more great tips!

Source: https://www.foremost.com/learning-center/mobile-home-skirting.asp

0 Comments

What's lurking below your mobile home?

11/19/2020

0 Comments

 
Picture
Do you remember when you were young and had to check under your bed for monsters before you could go to sleep? I sure do! Because of my hyperactive imagination and the poor decision to watch one too many cheesy 80s horror movies, I was absolutely terrified of monsters when I was a kid. Every night I would thoroughly inspect all of the best hiding places in my room before I reluctantly switched off the light and frantically dashed for my bed, fully expecting to be ambushed by a mob of gremlins as soon as everything was dark. I certainly didn't want any mischievous little critters to snack on one of my exposed limbs as I slept, so I wrapped myself in a cocoon of blankets as an extra precaution.

Now that I am an adult who is fairly confident that there are no monsters under my bed, I have a more important question to ask: What's lurking below your mobile home? The answer probably isn't monsters, but here are three things that you may find:

Animals
Mice, raccoons, squirrels, skunks, insects and other critters may invade the space below your mobile home and cause messes, loud noises, bothersome odors and other damages. Keeping your trash and recycle bins tightly closed and making a point to keep the underside of your home clean of trash and debris are good strategies for keeping otherwise curious animals away. It also helps to keep bird feeders a good distance from your home, as they attract pesky squirrels and raccoons. According to SFGate, sprinkling chili or habanero flakes in the dirt around your home is an effective way to repel many animals. But if you do end up finding an animal under your home, don't try to remove it yourself. Instead, call your local animal control service−they can help you find a safe solution.

Water
If there is an abundance of clay in the soil around your home or if your yard is not graded well, any water that collects under your home may not be able to drain properly. Rainfall and even plumbing leaks can lead to excess moisture, and if you don't act quickly to fix this problem, your home could become musty and moldy. My Mobile Home Makeover suggests addressing the issue of pooling rain water by stapling plastic sheeting to the bottom frames of skirting so that any water that collects will be absorbed beneath the plastic and will not damage the bottom of your home. You can also install gutters to prevent rain water from pooling underneath or around your home.

Holes
It never hurts to thoroughly inspect the bottom of your mobile home for holes. Gaps, tears and open spaces enable animals to sneak in and make your home their own. Holes could also expose water pipes and wires, which could easily be damaged by outside elements. If you find holes in the polyethylene belly wrap below your home, SFGate suggests stuffing fiberglass insulation into the space before patching it. Additionally, cleaning the area around the hole will make the patch stick more effectively. Lastly, if you plan to file a claim with your insurance company, be sure to take photos of the holes and other damages and keep careful records of your receipts and invoices related to any mobile home underbelly repairing projects.

Routinely checking under your mobile home for animals, water and holes will help you stay aware of potentially monstrous damages that require your attention.
0 Comments

Mobile home repairs: Drafts and leaks

11/14/2020

0 Comments

 
Picture
An ounce of prevention saves a ton of trouble when it comes to making your home more comfortable. Why put up with drafts, leaks, excess moisture, mildew or pesky pests when you don't have to?

You can put a stop to costly drafts or leaks before they start with the right sealant, caulking compound or roof coating. Unwanted moisture can be a problem even in today's well-built and insulated manufactured homes, but not if you take steps to control it. Pests inside or under your manufactured home can also cause trouble. Homeowners agree it's far easier to keep bugs or unwanted animals from getting into their manufactured home than it is to get rid of them once they've moved in! Here are some quick preventive maintenance tips that pay off in both time and money.

How to keep out drafts and leaks
Sealants, caulking compounds and roof coatings prevent leaks and drafts. Sealing your home is probably the easiest and least costly way to make your home more comfortable and energy efficient. Basically, any crevice, crack or connection (except the edges of siding panels) should be sealed.

To determine if your old caulk needs replacing, poke it with a screwdriver or nail. It should have a rubbery consistency. If it is hard, brittle and cracked, remove and replace it as part of your regular preventive maintenance. You will probably need more than one type of sealant to do your entire home. Here are some common sealant types:
  • Silicone Expensive, but excellent for most uses. High adhesion and longevity. Paint might not stick to surface.
  • Acrylic Latex Not quite as expensive as silicone. Good adhesion and longevity. Can be painted.
  • Vinyl Latex Somewhat expensive. Good around damp areas such as tubs and toilets.
  • Oil-Based Caulk Fairly inexpensive. Does not last long. Bonds well to most surfaces.
  • Expandable Foam An excellent way to fill gaps around pipes. Also provides insulation value. Very adhesive.
  • Roof Coating – Aluminum Based Available in a variety of grades. Should be applied to entire metal roof at least once every two years. Prevents leaks and corrosion.
  • Roof Coating – White Can be acrylic or elastomeric (rubber). More expensive than aluminum based roof coating. Prevents leaks and reflects sun's rays. Keeps house cooler in summer.
  • Patching Cement For use on a metal roof. Ideal for patching holes and sealing seams.
Source: ​https://www.foremost.com/learning-center/mobile-home-repairs-draft-and-leaks.asp
0 Comments

Mobile home window replacement

5/17/2020

0 Comments

 
Picture
If the frame on one of your mobile home windows is warped or severely weather damaged, replace it. Even if the frames aren't warped or damaged, windows that seem to constantly need repair or adjustment should be replaced. A new, efficient window keeps cold drafts out of your manufactured home and saves you energy dollars in the long run.

Before you buy a replacement for an old window, think about the style and size of the new window
you'd like. Things to consider are the window's location, whether you want a smaller or larger replacement, and the way the original window was mounted on your home. Don't assume that you must replace your old window with an exact duplicate. Many new energy-efficient windows, in a variety of styles, are made for manufactured homes.

Before you go shopping, determine the size of your existing window and check if the window is flush-mounted or mounted for lap siding. A flush-mounted window frame screws on over the siding. If the window has a lap-siding mount, the siding covers the window frame screws. Your new window should have the same type of mount as your current window, for appearance and ease of installation.
Before you order a new window, you may want to remove your old window and check that the opening is square. To do that, remove your window, and measure the opening diagonals corner to corner or use a framing square to measure the opening.

If the window opening is slightly off-square, you can use shims to fit in a new window. If the opening is significantly off-square, you can reduce the window opening by roughing a new, square frame for a smaller window or you can enlarge the opening for a larger window. It's usually easier to reduce the opening and install a smaller window.

If you are replacing a bedroom window, and it's the only exit from the bedroom to the outside, you probably won't be able to make the opening smaller. Bedroom windows that serve as egress windows in case of fire must meet minimum code requirements.

To replace your window, you'll need screws, putty tape, silicone sealant, and a screwdriver and/or replaceable drill with screwhead bits. When you purchase your new window, check with the window supplier about any special tools or screwhead bits you'll need.
  • Step 1: Remove siding You can skip this step if your frame is mounted over vertical siding. If your frame is mounted under lap siding, remove the siding around the window. Be careful – if you bend aluminum siding, you will not be able to get rid of the resulting crease.
  • Step 2: Remove window Using a reversible drill and proper screwhead bit, remove the screws around the edges of the frame. Note the size and type of screw. It's best not to reuse these screws. Instead, use new screws the same diameter and slightly longer than the originals. Once all the screws are out, remove the old window and frame.
    Scrape off all the old putty tape from the opening and frame. Apply new putty tape around the window frame. For extra moisture protection, apply two thicknesses of putty tape at the top of the opening. Applying putty tape is very important, especially if you have vertical siding. The tape fills any gaps between the window frame and the siding.
  • Step 3: Replace window Start by inserting one screw in the middle of all four sides. Be sure the screws go in straight. Do not tighten screws. Check to make sure the window is square before inserting more screws. After you have used about half the screws, open and close the window a few times to see that it is square and does not bind. Put in the remaining screws and tighten.
  • Step 4: Seal Run a bead of clear silicone sealant along the top of the window where it meets the siding. Replace any siding that was removed.
Source: https://www.foremost.com/learning-center/mobile-home-window-replacement.asp
0 Comments

Shingle Repair for Mobile Homes

3/30/2020

0 Comments

 
Picture
Learn About Mobile Home Insurance
The process for installing shingles on mobile homes is exactly the same as site-built homes. However, on site-built homes, two or three layers of shingles are acceptable. On a mobile home, one layer is the limit.
This means, if your shingles need replacing, that's exactly what you need to do – remove and replace them. You can't solve the problem by covering them with a second layer of shingles.

The reason is weight. A square of shingles that only covers 100 square feet, weighs about 240 pounds. Your roof might require nine or more squares. Mobile home roof trusses aren't built to handle the weight of a double layer of shingles.

Fix-It Tips!
If possible, replace your shingles on a hot day when they are more pliable and seal better.
Seal minor splits and cracks to shingles with roofing cement. You can also try to cement down curled shingles-but they will probably have to be replaced.

When Shingles Wear Out
Fiberglass and asphalt shingles are durable, water resistant, roofing materials. Under ideal conditions, some of the higher quality shingles may last 30 years, but that is optimistic. If your shingles have been up for 15 or more years, you might need to re-roof in the not-too-distant future – especially if you live in a snowbelt or high heat area. In addition, shingles on mobile homes with low-slope roofs have a tendency to wear out earlier. On a roof with less pitch, the shingles are more exposed to sun, water and snow.

It's important to periodically examine your shingles for damage after you have removed all debris. Check them every spring and fall, and after a hailstorm or high winds. Promptly replace any cracked, curled-up, broken or missing shingles. If you don't, rain water could seep under the sheathing and leak into your sidewalls or ceiling.

Examine the roof up close from a ladder. Particularly check the roof ridge and valleys for cracked shingles, and the bottom and side rows for curled back or broken shingles.

Replacing a damaged shingle is a relatively easy repair.
Here's what you'll need to replace shingles - 

Materials:
  • replacement shingles
  • roofing nails
  • roofing cement

Tools:
  • hammer
  • utility knife
  • long knife
  • small piece of plywood.

Step 1: Cut through sealer strips
If installed properly, each shingle should have eight nails holding it in place: four in the middle, about ½ inch above the tab cutouts (these four nails also go through the top of the shingle below), and four along the top (these four nails are pounded through the middle of the shingle above). See the diagram that shows how shingles are installed.

To replace one shingle, you need to loosen at least three shingles: the one being replaced and the two shingles on the two rows above the damaged shingle. You will need to cut through the sealer strip (also called “adhesive line”) on these shingles. The sealer strip is a dashed line of asphalt adhesive that runs across the middle of the shingle. To loosen, slide a long knife, putty knife or small crowbar under the damaged shingle. The tool must reach over halfway up the shingle. Slide it along the entire length of the shingle. Repeat this procedure for the shingles on the two rows above the damaged shingle.

Step 2: Remove nails along middle of damaged shingle
You do not want to crack or split the shingles above or below the damaged shingle. Carefully slide a pry bar under the damaged shingle. You might want to slide a piece of plywood under the pry bar to protect the shingle underneath. Gently pry up the damaged shingle, being careful not to damage the shingles above. You do not need to pry the damaged shingle up very far-just enough to loosen the four middle nails.

Remove the pry bar and plywood. Carefully lift up the tabs on the shingle above the damaged shingle. Work the nails (in the middle of the damaged shingle) back and forth with your fingers until you can remove them.

Step 3: Repeat procedure on next level
Remove the four nails holding down the top of the damaged shingle. Because these nails are also holding down the middle of the shingle just above, you will need to gently pry up this shingle to loosen nails.
Carefully slide the pry bar under the shingle just above the damaged shingle. Repeat the previous procedure to loosen nails. You do not need to remove these nails. Loosen them just enough so they no longer go through the damaged shingle.

Step 4: Remove shingle
Slide out the damaged shingle. Use it to size the replacement shingle (if it is not full width.)

Step 5: Replace shingle
Make sure the replacement shingle is the same size as the old shingle. If not, use a utility knife to cut to fit. Slide new shingle into place, and set flush with adjacent shingles. It should fit snugly.

Step 6: Nail
Attach shingle with roofing nails. To prevent leaks, pound nails in already existing holes. If this is not possible, seal the existing nail holes in the shingles with roofing cement. You will probably need to pound in the nails after you have laid all the shingles flat. This means you will have to hit the nails through the shingle immediately above. To prevent damaging the shingles, place a board on top of the shingle and hit the hammer on the board.

Step 7: Cement
Cover all the nails with roofing cement. Press the upper shingles on top of the cement to seal. You may need to weight it down overnight.

Source: https://www.foremost.com/learning-center/staying-on-top-of-shingle-repair.asp

Quote Mobile Home Insurance Now
0 Comments

Mobile Home Anchors & Tie Downs

9/27/2018

0 Comments

 
Mobile Home Quote
Picture
When strong winds blow, manufactured homes need special protection. No matter where you live, you need tie-downs and anchors to keep your manufactured home stable and secure. Before you start the job, you should understand why this wind protection system is necessary, and know the basic requirements for tie-downs and anchors. You also need to become familiar with all the components that make up your anchoring system. It's a good idea to consult with an experienced professional installer or building inspector if you have any questions or doubts about the installation.
Why Mobile Home Tie-Downs?
Manufactured homes must have anchors and tie-downs to keep them in place during high winds. Compared to site-built homes, manufactured homes are relatively lightweight. They have flat sides and ends, and they are built on frames rather than foundations. Almost all manufactured homes are elevated, situated on top of some sort of pier or foundation system. Wind can get under the homes and lift them up. In addition, the wind passing over the top of your manufactured home can create an uplift force.
To resist wind forces, you need two different types of tie-downs. In older homes, a vertical or over-the-top tie-down is needed to compensate for the uplift force. A diagonal or frame tie-down is needed to compensate for both lateral and uplift forces. Singlewide manufactured homes need both types of tie-downs. Doublewide homes only need the diagonal ties.
Picture
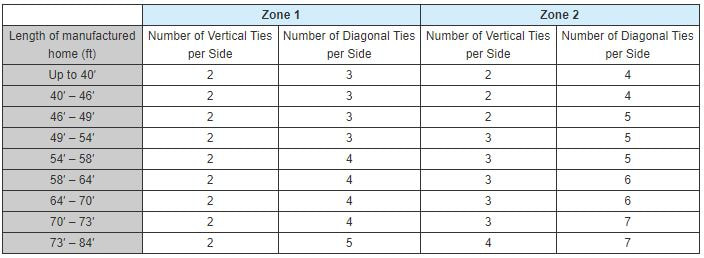
Tie Down Requirements For Manufactured Homes
• Singlewide manufactured homes require both diagonal and vertical ties.
• Doublewide manufactured homes require only diagonal ties.

Length of manufactured home (ft)Number of Vertical Ties per SideNumber of Diagonal Ties per SideNumber of Vertical Ties per SideNumber of Diagonal Ties per Side

• To determine the length, do not include the draw bar.
• Numbers based on minimum working load per anchor of 3,150 pounds, with a 50% overload of 4,725 pounds.
• Diagonal ties must deviate at least 40 degrees from a vertical direction.
• If your home has special site considerations, a registered professional engineer or architect can devise an alternate anchoring system.

Anchoring System Components
  • Types Of Tie-Downs.The type of tie-down you select usually depends on when your manufactured home was built. Older homes often have exposed over-the-top tie-downs. This is an effective system, but it does detract from the appearance of your house. The straps are placed over the siding and roof. Until recent years, most manufactured homes came equipped with concealed over-the-top tie-downs. These straps are located just under the exterior siding and metal roof. The end of the strap hangs out under the manufactured home. Newer model homes might not have any type of over-the-top tie-down. Because of increased structural strength of manufactured homes, these models are secured with anchoring straps attached to the home's steel frame rails, called frame anchors. Doublewides are also secured with frame anchors.
  • Types Of Anchors.You'll find anchors available for different types of soil conditions, including concrete slab. Auger anchors have been designed for both hard soil and soft soil. Rock anchors or drive anchors allow attachment to a rock or coral base. This type of anchor is also pinned to the ground with crossing steel stakes. If you will be pouring a concrete base, you can install a concrete anchor first. 

    You need to know your soil type to select the right anchor. Soil classifications usually include: rock/hard pan, heavy, sandy gravel, heavy sand, silty gravel, clayey gravel, clay, silty clay, clayey silt, uncommitted fill or peat/organic clay. 

    Whatever type of anchors you select, carefully follow the installation instructions. Auger anchors (screw-in anchors) can be installed manually by inserting a metal bar through the top of the anchor for added leverage or with a machine designed for this purpose. It's important to screw this type of anchor in. Do not dig a hole to install.
  • Hook-Up And Tension Device:The tie-down must be connected to the anchor with a system that allows for adjusting the tension. It must also be weather resistant and strong enough to support as much weight as the anchor and tie-down. If the tie-down is fastened to a ground anchor with a drop-forged turnbuckle, the turnbuckle should be ½ inch or larger galvanized steel. The turnbuckle should have forged or welded eyes, not hook ends.
  • The Roof Protector.If you have exposed over-the-top tie-downs, you must have some sort of roof protectors placed under the strap or cable at the edge of the roof. Roof protectors are also called roof brackets, buffers or thimbles. These prevent the tie-down strap or cable from damaging the roof and will prevent the edge of the roof from cutting through the tie-down. Wood blocks will work, and are better than nothing, but commercial protectors will do a better job of distributing the pressure of the cable. Commercial protectors will last longer, too.
  • Specifications.Make sure all your anchoring equipment (anchors, turnbuckles, straps, hookups) is capable of resisting an allowable working load of at least 3,150 pounds. The equipment must also be capable of withstanding a 50 percent overload, 4,725 pounds. This also applies to the attachment point on the manufactured home. Only use anchoring equipment that is weather and corrosion resistant. YOU MUST ALIGN EXPOSED OVER-THE-TOP TIE-DOWNS WITH A ROOF RAFTER TO PREVENT DAMAGING THE ROOF. 

    Tie-downs can be either cable or strap. If cable is used, it should be galvanized steel or stainless steel. Minimum diameter size is 3/8 inches for 7 x 7, or ¼ inch for “aircraft” cable, 7 x 19. If flat steel strapping is used, it must be a minimum of 1-¼ inches wide x .035 inches thick.
Tie-Down And Anchor Installation
Installing a tie-down and anchoring system is not too complicated for most do-it-yourselfers. It's wise, however, to seek experienced help to make sure you are using the proper anchor for your soil conditions, enough anchors for your wind conditions, the correct tension on your tie-down, and proper angle for your frame tie-downs. At the very least you should have a building inspector or a trained installer check over your finished work.
  • Step 1: Level HouseMake sure your home is level before anchoring it to the ground.
  • Step 2: Check ChartsCheck the wind zone chart for your location and determine the required number of anchors recommended for your zone. You should regard this number as the minimum needed for your home.
  • Step 3: Determine Soil TypeMerely looking at the ground under your home isn't enough. Some types of anchors need to be installed five feet deep. Talk to a building inspector to determine your soil type. If you will be attaching your tie-downs to a concrete foundation, make sure it is at least 4 inches thick.
  • Step 4: Select AnchorsTalk to a supplier or installer for advice. Your soil type will determine the type of anchor.
  • Step 5: Select Hook-UpDepending on your tie-down system, over-the-top or frame, select the appropriate hook-up and tensioning device. Make sure the entire system is certified to a 4,725 pound capacity.
  • Step 6: Locate Wires/CablesMark the location of your electric, cable, gas, water, sewer and phone lines on the ground before you install anchors. Make sure you have located everything prior to digging.
  • Step 7: Position Over-The-Top Tie-DownsIf you are installing an exposed over-the-top tie-down, the strap or cable should be positioned over a roof rafter. Protect the edges of your roof with a roof protector of some type. Make sure the strap or cable does not cover a window or door.
  • Step 8: Install AnchorYou'll find specific installation instructions with your anchor. Follow them carefully. For a vertical tie-down, the anchor is installed vertically. 

    For a frame/diagonal tie-down, the anchor can be installed to the same angle as the tie-down. This angle should be at least 40 degrees. The anchor can be installed vertically if you also install a stabilization device to keep the anchor from moving sideways. A metal stabilization device can be attached to the top of the anchor and buried in the ground. Another option is to pour a concrete collar around the top of the anchor. The collar should be at least 10 inches in diameter and 18 inches deep.
  • Step 9: Adjust TensionAlternating from side to side, adjust your tie-downs to the appropriate tension. Don't do one side of your house and then the other.
Remember: Anchoring and tie-down systems vary greatly. It's important for you to contact the local building inspector for regulations regarding anchoring and blocking installation in your community. Regulations vary considerably from one community to the next. In some states, tie-downs aren't required. In other states, tie-downs are stringently regulated and inspected.
To make sure you're tied down safely, consult your local building inspector. 

Looking for Mobile Home insurance?
In addition to following the proper steps to tie-down and anchor your mobile home, make sure you have a good mobile home insurance policy in case the unexpected happens.


Source: Foremost Insurance - Mobile Home Repair - How to Install Tie Downs And Anchors
0 Comments

    Categories

    All
    ATV
    Boats
    Business
    Condo
    Dental
    FAQs
    Financial
    Flood
    Golf Cart
    Health
    Home
    Insurance
    Insurer Liquidation
    Life
    Local
    Mobile Home
    Motorcycles
    RV's
    Safety
    Snowmobile
    Summer
    Trailer

    Archives

    July 2023
    May 2023
    October 2022
    September 2022
    July 2022
    June 2022
    March 2022
    February 2022
    December 2021
    October 2021
    May 2021
    March 2021
    February 2021
    January 2021
    December 2020
    November 2020
    October 2020
    September 2020
    August 2020
    July 2020
    May 2020
    April 2020
    March 2020
    February 2020
    December 2019
    June 2019
    May 2019
    April 2019
    March 2019
    February 2019
    January 2019
    December 2018
    November 2018
    September 2018
    May 2018
    April 2018
    February 2018
    November 2017
    October 2017
    September 2017
    August 2017
    April 2017
    March 2017

    RSS Feed

Social Media

Contact Us

Click Here to Email Us

Navigation

Homepage
Insurance Quotes
Policy Service
Insurance Products
Contact Us
Leave a Review
Florida
6650 W. Indiantown Rd.
Jupiter, FL 33458


(561) 768-8176

Texas
11811 North Freeway, 
Houston, TX 77060

(713) 487-5538

Website by InsuranceSplash
© 2024 by HARRIS, REED & SEIFERTH INSURANCE GROUP, INC. All rights reserved. | Privacy Policy 
Photos used under Creative Commons from Ian Sane, allesopdemotor.nl de meest informatieve motor site, Carl Johan, Peter O'Connor aka anemoneprojectors, Jim Larrison, martinrstone, Gamma Man, onnola, andreboeni, anathea, Haydn Blackey, frankieleon, spartangreen293, shixart1985, Peter_Mackey, electricteeth, MarkMoz1980, Gamma Man, NetReacher Image Studios, woodleywonderworks, andreboeni, Ben Baligad, Prayitno / Thank you for (12 millions +) view, michaeljohnbutton